Melnā ekrāna problēma operētājsistēmā Windows 10 parasti rodas pēc jaunināšanas vai tad, kad automātiskā Windows atjaunināšana instalē atjauninājumus jūsu sistēmā. Tā kā šis melnais ekrāns, visticamāk, ir aparatūras (GPU) problēma, mums būs jānovērtē un jānovērš dažādi iestatījumi, lai to diagnosticētu un novērstu.

Mūsdienās personālie datori kļūst arvien progresīvāki, izmantojot vairākas grafikas kartes lielai lietošanai. Tātad, ja jums ir cita grafiskā karte, nevis Intel iebūvētais grafiskais kontrolieris , jums, iespējams, būs šī sāknēšana melnā ekrāna problēmai. Dažreiz Windows to uztver tā, it kā sistēmai būtu pievienoti divi monitori. Tātad, Windows ielādē izejas signālu melnajā ekrānā.
Pirms mēs sākam plašu problēmu novēršanu; mums jāpārbauda daži pamata iestatījumi. Ja izmantojat vairākus monitorus, atvienojiet / atjaunojiet savienojumu un veiciet pārbaudi ar primāro ekrānu. Ja tas problēmu atrisina; tev paveicās. Ja nē, rīkojieties šādi:
1. metode: salabojiet to akli
Šī metode ir paredzēta problēmas aklai novēršanai, jo melnajā ekrānā neko nevar redzēt.
- Kad Windows iestrēgst melnajā ekrānā, pagaidiet, līdz ekrānā parādās baltais peles kursors . Jūs varat pārbaudīt tā klātbūtni, pārvietojot peles paliktni.
- Kad kursors ir parādījies ekrānā, nospiediet tastatūras atstarpes taustiņu un vienreiz nospiediet tastatūras taustiņu Ctrl . Akli ievadiet pieteikšanās paroli vai PIN kodu (melnajā ekrānā to nevar redzēt) . Tas pieteiktos sistēmā Windows, izmantojot jūsu akreditācijas datus.
Ja pēc pieteikšanās savā kontā neredzat darbvirsmu un esat iestrēdzis melnajā ekrānā, tad tastatūrā nospiediet Win + P + lejupvērstās bultiņas taustiņš (divreiz) un vēlreiz ievadiet informāciju.
2. metode: barošanas cikls
Ja tas ir klēpjdators ar lietotāja noņemamu akumulatoru, tad;
- Izņemiet akumulatoru.
- Atvienojiet strāvas adapteri.

- Nospiediet un turiet ieslēgšanas / izslēgšanas pogu 10 sekundes
- Atlaidiet barošanas pogu.
- Pievienojiet lādētāju atpakaļ un mēģiniet to ieslēgt.

Pārbaudiet un pārbaudiet, vai problēma ir atrisināta; ja nē, pārejiet pie 4. metodes
3. metode: izslēdziet ātro startēšanu
Windows 10 tiek izlaists ar Fast Startup funkciju. Kā norāda nosaukums, tas ļauj ātri palaist operētājsistēmu, lai jūs varētu atsākt darbu vai ātri spēlēt.
PIEZĪME . Ātrās palaišanas funkcija darbojas tikai tad, kad veicat izslēgšanu un pēc tam ieslēdzat sistēmu, tā netiek piemērota, veicot restartēšanu .
Lai izslēgtu ātras palaišanas iespēju; veiciet šīs darbībasSāknēšana, izmantojot Windows 10 instalācijas datu nesēju. Iespējams, būs jāmaina sāknēšanas secība no BIOS.
skatiet: kā izveidot sāknējamu Windows 10 multividi
- Apakšā noklikšķiniet uz Labot datoru
- Noklikšķiniet uz Problēmu novēršana
- Noklikšķiniet uz Papildu opcijas
Piezīme. Ja šī metode nedarbojas, mēģiniet noklikšķināt uz “Atgriezties iepriekšējās versijās” un izpildiet ekrānā redzamos norādījumus.
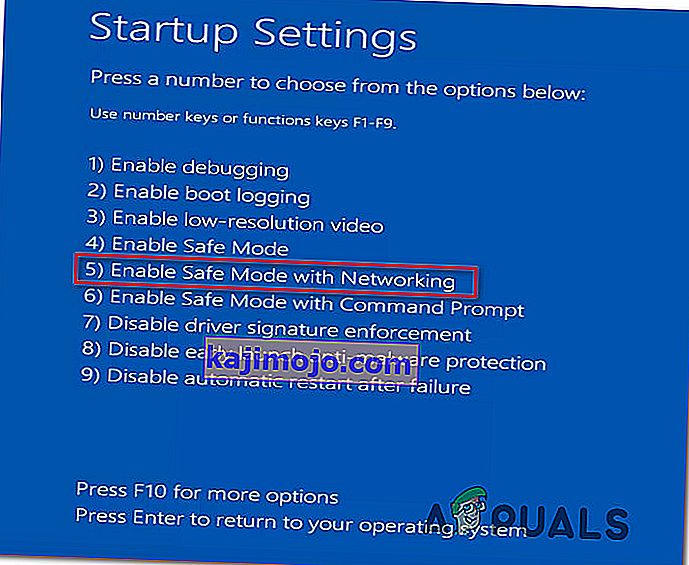
- Noklikšķiniet uz Startēšanas iestatījumi
- Noklikšķiniet uz Restartēt
- Atlasiet Drošais režīms ar Tīklošana
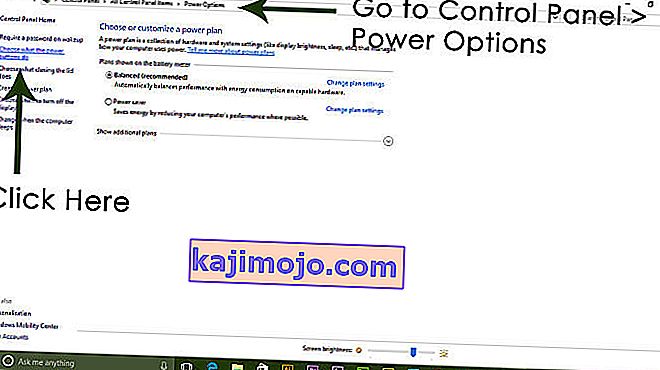
- Kad dators sāk pāriet uz vadības paneli ;
- Atlasiet Enerģijas opcijas ; Pa kreisi atlasiet Izvēlēties, ko dara barošanas pogas .

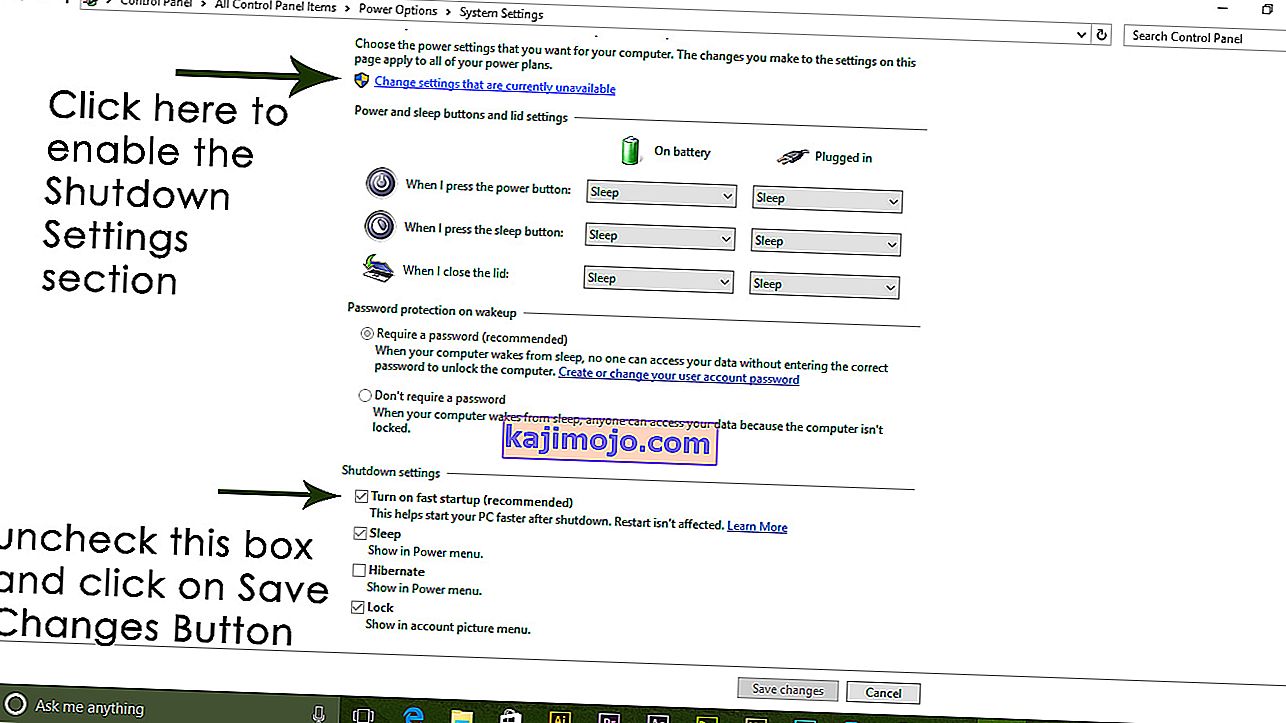
Šeit ritiniet uz leju un atrodiet opciju Ātrā startēšana un noņemiet atzīmi no tās.
4. metode: atinstalējiet displeja adapteri
Kad redzat melno ekrānu:
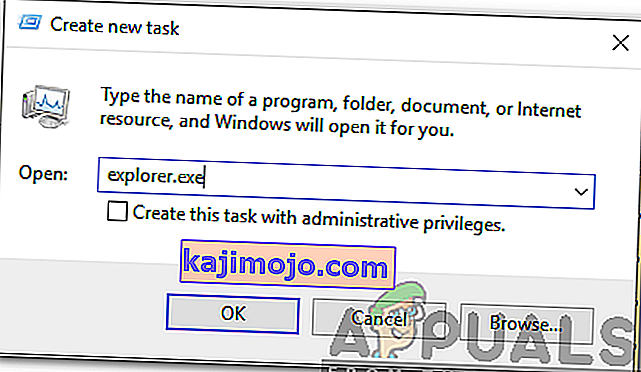
- Turiet kopā taustiņus CTRL + ALT + DEL, lai redzētu, vai tiek parādīts uzdevumu pārvaldnieks. Ja tā notiek, noklikšķiniet uz Fails -> Jauns -> un ierakstiet explorer.exe
- Ja tas atver Explorer logu; piesakieties un atinstalējiet pretvīrusu programmatūru / grafisko karti un pēc tam atkārtoti instalējiet.
Piezīme. Varat arī uz laiku atspējot antivīrusu, nevis to atinstalēt.
- Lai atinstalētu grafikas / displeja adapteri; ja CTRL + ALT + DEL ir veiksmīgs un redzat pētnieka logu, turiet Win taustiņu un nospiediet R
- Ierakstiet hdwwiz.cpl un noklikšķiniet uz Labi
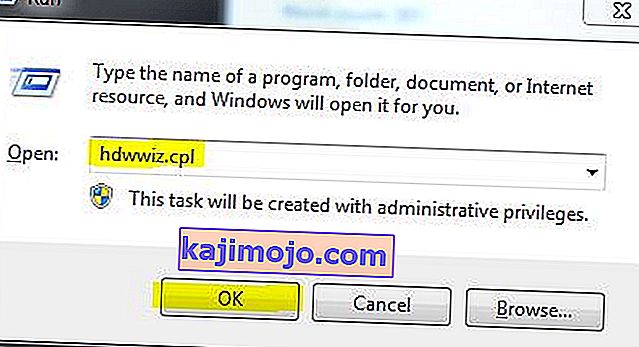
- Pierakstiet displeja adaptera nosaukumu;
- Izvērsiet Displeja adapteri -> atlasiet Atinstalēt


Pēc atinstalēšanas dodieties uz ražotāja vietni, lai lejupielādētu jaunāko draiveri. Pārstartēt & TEST
5. metode: atjaunojiet sistēmas sākotnējos rūpnīcas iestatījumus
Šī metode izdzēsīs visus jūsu datus un ievietos / instalēs sākotnējo operētājsistēmu, kas tika piegādāta kopā ar datoru. Tā kā pastāv korupcija; un, ja dati nav svarīgi, mēs varam tos atjaunot pēc rūpnīcas noklusējuma, pēc tam veiciet Windows tīru instalēšanu. Pēc tam jaunināšanas opcija, iespējams, vairs nebūs.
Rūpnīcas atjaunošanas instrukcijas skatiet savas sistēmas rokasgrāmatā.
6. metode: vienkārši restartējiet datoru
Daži no Windows 10 lietotājiem, kuri agrāk ir cietuši no melnā ekrāna problēmas, vienkārši izslēdzot datoru, izmantojot tā barošanas pogu, un pēc tam to atkal dublējot, izdarīja šo triku un atbrīvojās no problēmas. Lai cik dīvaini tas izklausītos, šis risinājums noteikti ir vērts dot kadru.
7. metode: atjauniniet GPU draiverus uz jaunākajām versijām
Windows 10 is a big step up from the previous versions of Windows, which is why all GPU manufacturers had to create entirely new drivers designed specifically for the new Operating System. Not having the updated Windows 10-compatible drivers on your computer is another thing that can cause your computer to be affected by the black screen issue. If outdated drivers are behind the black screen problem in your case, all you need to do is go to the official website of your computer manufacturer or your GPU’s manufacturer and download the latest drivers for your GPU (they should be available in both locations). Make sure that the drivers you download are specifically designed for Windows 10 to ensure the success of this solution.
Method 8: Change your laptop’s plugged in brightness to anything but 100%
On laptops that had high-end graphics cards and were updated to Windows 8, the black screen issue often presents itself when they are plugged into an AC power outlet. If that is the case, simply opening the Start Menu, searching for Advanced power settings, opening Advanced power settings and changing your laptop’s screen brightness when plugged into anything except for 100% (even 99% will do) will get rid of the black screen problem.
Method 9: If you have two graphics cards, disable the onboard one
A decent fix for the black screen issue for people whose computers have tow graphics cards – the onboard graphics card that came with the computer and the graphics card that they have added to it (such as an Nvidia or AMD graphic card) – is to simply disable the onboard graphics card. Apparently, having two graphics cards on a Windows 10 computer can result in a clash that consequently gives birth to the black screen issue. If that is the case, simply going into Device Manager, expanding the Display adapters section, right-clicking on the onboard graphics card and clicking on Disable should fix the issue.
If you do not see your onboard graphics card in the Display adapters section, click on View in the top left of the Device Manager dialog and click on Show hidden devices. This will make your onboard graphics card (or, in some cases, cards) visible, and you can then right-click on it and click on Disable.
Method 10: Refresh your computer
The infamous black screen issue on Windows 10 can also be fixed by simply refreshing your computer. Refreshing your computer has almost entirely the same effect as resetting it to factory settings, with the exception of the fact that a refresh only deletes installed programs and applications and keeps your personal data whereas a reset gets rid of everything on your computer. To refresh a Windows 10 computer, you need to:
- Open the Start Menu.
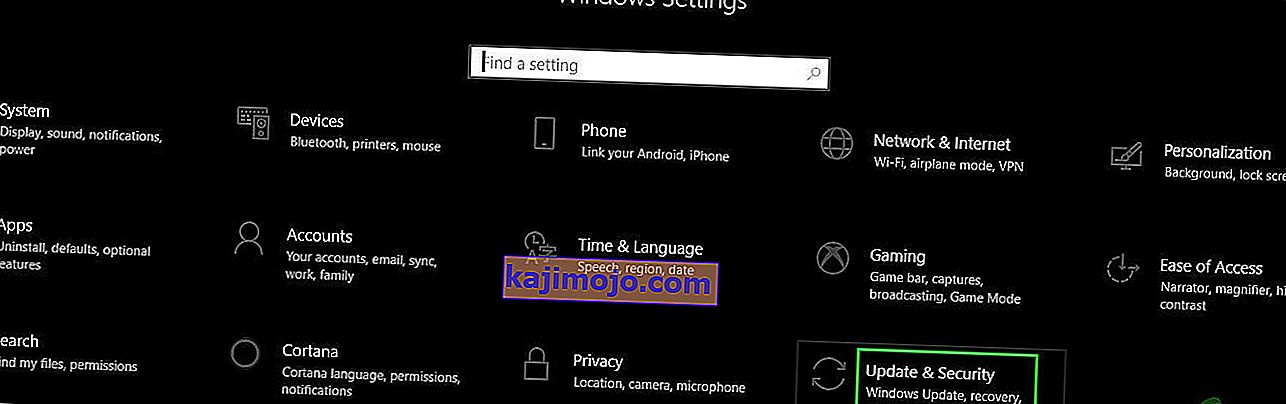
- Click on Settings.
- Out of the array of different options provided, click on Update & Security.
- Click on Recovery in the left pane.
- In the right pane, click on the Get started button under the Reset this PC
- When provided with a choice to either keep your files or remove everything, click on Keep my files.

Method 11: Correcting User Shell
In some cases, the User shell might be preventing the user from being able to boot safely into their computer. In certain situations, the user shell configuration inside the registry might get corrupted due to which this black screen issue can occur. Therefore, in this step, we will be correcting this user shell entry. In order to do that, follow the steps below.
- Boot your computer and wait for the black screen to appear.
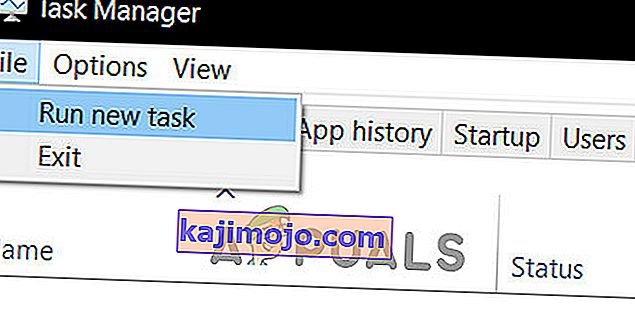
- Press “Ctrl” + “Alt” + “Del” and select the “Task Manager” option.
- Click on the “File” option on the top left of the task manager and select “Run New Task” from the list.
- Type in “regedit” and press “Enter” to open it.
Computer\HKEY_LOCAL_MACHINE\SOFTWARE\Microsoft\Windows NT\CurrentVersion\Winlogon
- Double click on the “Shell” entry on the right pane.
- Type in “Explorer.exe” in the Value data field and save your changes.
- Press “Ctrl” + “Alt” + “Del” again and click on the “Power Options” icon on the lower right side.

- Select “Restart” from the menu and wait for your computer to be restarted.
- Check to see if the issue persists after restarting the computer.


Method 12: Stopping Service
There is a specific service that prevents the computer from being able to function properly in some cases and stopping it can prevent the black screen issue from occurring. Therefore, in this step, we will be stopping this service. For that:
- Press “Ctrl” + “Alt” + “Del” and select the “Task Manager” option.
- Click on the “File” option on the top left of the task manager and select “Run New Task” from the list.
- Type in “services.msc” and press “Enter” to open it.
- Scroll through this list and look for the “RunOnce32.exe” or the “RunOnce.exe” entry. Also, do this same process for the “App Readiness” Service.
- Right-click on it and select “Stop”.
- Double click on it and change its startup type to “Disabled”.
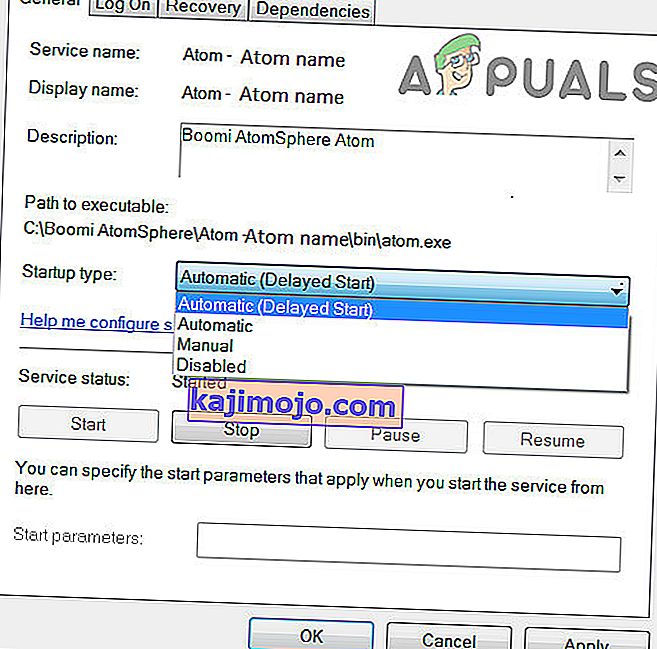
- Wait for the service to be stopped completely and restart your computer.
- Check to see if the issue persists after stopping it completely.

Method 13: Renaming Files
In certain cases, the files in some Windows’ folders might have gotten corrupted due to which this black screen issue is being triggered. Therefore, in this step, we will be renaming these files and then check to see if the issue still persists.
- Press “Ctrl” + “Alt” + “Del” on the black screen.
- Click on the “Task Manager” option and then select “File”.
- Select the “Run New Task” option and then type in “cmd”.
- Type in the following command one by one for each file to rename it.
rename “(File Path) (File Name)” “(New Name)”
- Rename the following files to anything except their original names.
C:\ProgramData\Microsoft\Windows\AppRepository\StateRepository-Deployment C:\ProgramData\Microsoft\Windows\AppRepository\StateRepository-Deployment C:\ProgramData\Microsoft\Windows\AppRepository\StateRepository-Deployment C:\ProgramData\Microsoft\Windows\AppRepository\StateRepository-Machine C:\ProgramData\Microsoft\Windows\AppRepository\StateRepository-Machine C:\ProgramData\Microsoft\Windows\AppRepository\StateRepository-Machine
- Check to see if the issue persists after making these changes.
- If it still does, try the following code to just fix it.
cd "ProgramData\Microsoft\Windows\AppRepository" ren "StateRepository-Deployment.srd" "StateRepository-Deployment-Corrupted.srd" ren "StateRepository-Deployment.srd-shm" "StateRepository-Deployment-Corrupted.srd-shm" ren "StateRepository-Deployment.srd-wal" "StateRepository-Deployment-Corrupted.srd-wal" ren "StateRepository-Machine.srd" "StateRepository-Machine-Corrupted.srd" ren "StateRepository-Machine.srd-shm" "StateRepository-Machine-Corrupted.srd-shm" ren "StateRepository-Machine.srd-wal" "StateRepository-Machine-Corrupted.srd-wal"
- Check to see if the issue persists.
Method 14: Replacing Profile Cache
It is possible the Profile cache for your current user account has either gone missing from some locations or it has been corrupted in certain locations due to which this issue is being triggered. Therefore, in this step, we will be replacing this profile cache after copying it from a location. For that:
- Create a new user account before doing so and log into that.
- Restart your computer in safe mode.
- Log in to your new profile.
- Navigate to the following location and copy the folder named “caches”.
C:\Users\{working-user-profile-name}\AppData\Local\Microsoft\Windows\Caches - Paste this folder in the following location.
C:\Users\{broken-user-profile-name}\AppData\Local\Microsoft\Windows\Caches. - Check to see if the issue persists.
Follow the onscreen instructions and dialogs, and once you are done, your computer will have been refreshed and the black screen issue will be no more.
You can further try to:
- Boot your computer in safe mode and check if the issue persists over there. This will help you to isolate these issues from a specific app that is causing it.
- Press “Windows” + “P” to switch displays that might fix this.
- Update your Bios
- Disconnect the Second monitor
- Try to use an HDMI cable for connection instead of a DVI or VGA one.
- When in the black screen, press the “Windows’ + “Ctrl” + “Shift” + “B” keys to refresh the Graphics Driver.
- You can also try to perform a Startup Repair.
- Try to create a new user account using the last methods listed in this article.
- Veiciet SFC un DISM skenēšanu.