0xc000000e kļūda mēģinot boot up logi nozīmē, ka jums ir darīšana ar bojātu sāknēšanas konfigurācijas datus. Sāknēšanas konfigurācijas dati ir globāls visu opciju un iestatījumu veikals, kas saistīti ar sāknēšanu jaunākos Windows datoros.
Mēģinot ielādēt ierīci, jūs saņemsit šo kļūdu, un jums tiks parādīts melns ekrāns, kurā sniegtas instrukcijas, kā salabot datoru, izmantojot instalācijas disku vai atkopšanas disku. Diemžēl vienīgais veids, kā atrisināt šo problēmu, ir šī atkopšanas diska izmantošana, tāpēc pirms darba sākšanas jums tas ir jāpiestiprina. Ja jums to nav, to izveidot ir viegli, izmantojot Rufus vai Windows Media Creation rīku no jebkura cita datora vai klēpjdatora.

Jums arī būs jāielādē BIOS, lai mainītu sāknēšanas kārtību un izveidotu datora sāknēšanu no atkopšanas diska, nevis cietā diska. Lai to izdarītu, veiciet šādas darbības:
- Ievadiet BIOS vai UEFI iestatījumus, pirms Windows sāknēšanas nospiežot mātesplatē ražotāja norādīto taustiņu. Šis taustiņš parasti ir Esc, Delete, F2, F8, F10, F12 vai Backspace, atkarībā no ražotāja. Jūs varat tiešsaistē meklēt, kā ievadīt BIOS, kam seko datora modelis.
- Pēc tam, kad iekšpusē, pārejiet uz Boot Izmantojiet norādījumus rasts BIOS mainīt boot secību, un noteikts vai nu CD-ROM vai USB ports, lai pirmo ierīci, atkarībā no tā, vai jūsu atkopšanas disks ir CD vai flash drive .
- Saglabājiet iestatījumus un izejiet.

1. metode: atjaunojiet sāknēšanas konfigurācijas datus
Lai to izdarītu, dators būs jāpalaiž no atkopšanas diska. Ja esat konfigurējis BIOS, veicot iepriekš norādītās darbības, to varat izdarīt, nospiežot jebkuru taustiņu, tiklīdz uzvedne tiek parādīta displejā. Kad dators ir sāknēts no atkopšanas diska, veiciet šādas darbības, lai atjaunotu BCD:
- Dialoglodziņā Windows iestatīšana iestatiet visu atbilstošajām vērtībām, atlasiet valodu un noklikšķiniet
- Apakšējā kreisajā stūrī noklikšķiniet uz Labot datoru , un izvēlēties traucējummeklēšanu no Izvēlieties opciju ekrānu.
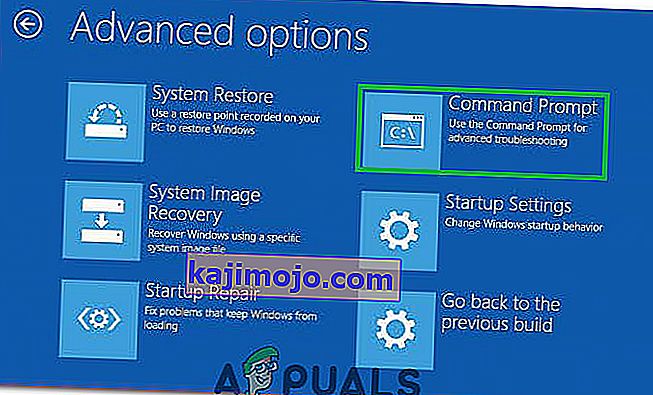
- Jo Problēmu novēršana ekrānā, noklikšķiniet uz Papildu opcijas, un noklikšķiniet uz Komandu uzvedne.
- Kad tiek atvērta komandu uzvedne, ierakstiet šādas komandas, pēc katras no tām tastatūrā nospiežot Enter :
bootrec / scanos bootrec / fixmbr bootrec / fixboot bootrec / rebuildbcd
- Pārstartējiet datoru, un tam vajadzētu darboties tikai lieliski, atkal nerisinot problēmu.

2. metode: labojiet OS ar atkopšanas disku
Šī metode arī labos jūsu OS, izmantojot atkopšanas diska komandu uzvedni, un jums vajadzētu būt iespējai boot sistēmā Windows, atkārtoti nerisinot problēmu. Boot no atkopšanas diska un izpildiet tālāk sniegtos norādījumus.
- Izmantojiet iepriekšējās metodes 1. līdz 3. darbību, lai nokļūtu atkopšanas diska komandu uzvednē .
- Kad esat komandu uzvednē, ierakstiet zemāk esošās komandas, pēc tam tastatūrā nospiediet taustiņu Enter , lai tās izpildītu. StartRep.exe lietderība labo zābaku vides vērtības un vajadzētu noteikt BCD kļūda. Ņemiet vērā, ka, iespējams, šī darbība var neizdoties, atkārtot vairākas reizes.
cd x: \ sources \ recovery StartRep.exe
- Ja iepriekšējais Windows labošanas solis nepalīdzēja, komandu uzvednē ierakstiet bcdedit , lai redzētu Windows sāknēšanas pārvaldnieka vērtības.
- Ņemiet vērā vērtības Device . Ja tās nav zināmas , ierakstiet šādas komandas, katrai no tām sekojot Enter, lai tās izpildītu. Ņemiet vērā, ka , ja nepieciešams, aizstājiet C: ar nodalījumu, kurā ir instalēta jūsu operētājsistēma.
bcdedit / set {DEFAULT.EN_US} ierīces nodalījums = c: bcdedit / set {DEFAULT.EN_US} osdevice partition = c: bcdedit / set {BOOTMGR.EN_US} ierīces nodalījums = c:- Kad komandu uzvedne ir pabeigta, aizveriet to, noņemiet atkopšanas disku un restartējiet sistēmu. Sākot tūlīt, tam nevajadzētu būt problēmām.
Vienīgais šo risinājumu mīnuss ir tas, ka tiem nepieciešams atveseļošanās spēks, pacietība un spēcīgi nervi. Tomēr, ja jūs tos ievērojat, kā aprakstīts, jums vajadzētu novērst saņemto kļūdu un turpināt izmantot ierīci tāpat kā iepriekš.
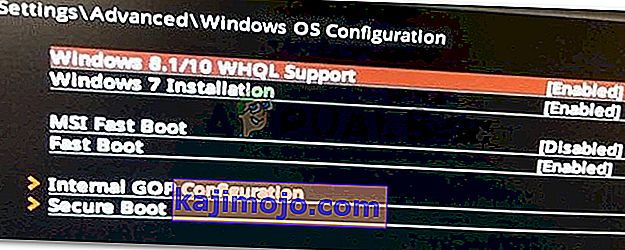
3. metode: iespējojiet Windows 10 WHQL atbalstu BIOS
Windows 10 WHQL atbalsta iestatījums pastāv dažos OEM. Tam ir divas pamatfunkcijas: pārbauda parakstītos draiverus sāknēšanas procesa laikā un ļauj iespējot UEFI atbalstu. Ja izmantojat operētājsistēmu Windows 10, tas ir jāiespējo, un pēc tam jūsu dators var sākties normāli. Tomēr, ja tas nav atlasīts, jūsu dators var palaist kļūdu 0xc000000e. Tātad, jūs varat piekļūt BIOS, lai redzētu, vai ir iespējots Windows 10 WHQL atbalsta iestatījums. Ja nē, ļaujiet tai izmēģināt.
Jums jāņem vērā, ka Windows 10 WHQL atbalsta iestatījums netiek atbalstīts visos datoros. Ja datorā tā nav, varat doties pārbaudīt, vai jūsu datorā ir iespējots UEFI atbalsts. Ja nē, varat to iespējot, lai redzētu, vai kļūdas kods 0xc000000e pazūd. Lai to iespējotu:
- Pilnībā izslēdziet datoru un ļaujiet tam sēdēt vismaz pāris minūtes.
- Kad esat pārliecinājies, ka ir pagājis pietiekams laiks, palaidiet datoru dublējumkopijā, un jums vajadzētu pamanīt opciju “ Nospiediet šo pogu, lai sāktu Bios režīmā ”.
- Nospiediet pogu, lai sāktu Bios režīmā.
- Pēc veiksmīgas sāknēšanas Bios režīmā pārbaudiet, vai Bios ir Windows WHQL iestatījums.
- Ja tā atrodas, nospiediet taustiņu “Enter”, lai to atlasītu pēc iezīmēšanas, izmantojot bulttaustiņus, un atlasiet opciju “Enabled”, lai to iespējotu datorā.
- Pārbaudiet , vai tas atrisina problēmu.

Ja pēc Windows 10 WHQL atbalsta iestatījuma vai UEFI atbalsta iespējošanas joprojām parādās Windows 10 sāknēšanas kļūda 0xc000000e, iespējams, datorā būs jāatiestata BIOS / UEFI konfigurācija.
4. metode: atjaunojiet BCD, izmantojot Easy Recovery Essentials
Easy Recovery Essentials ir viena klikšķa automatizēta sistēmas labošanas funkcija, kas ietver pilnīgu BCD remontu un rekonstrukciju, lai novērstu kļūdu “0xc000000e”, pat gadījumos, kad kļūdas dēļ Windows netiks sāknēts.
EasyRE automatizētais sāknēšanas remonta komponents novērsīs visas ar BCD saistītās problēmas, novērsīs BCD vai atjaunos to no jauna, izmantojot pareizu kodējumu un ceļu nodalījumam, kurš atsakās pareizi ielādēt. Tas arī atzīmēs disku kā tiešsaistē, lai pārliecinātos, ka tas darbojas pareizi.
Easy Recovery Essentials garantē automātiski novērst kļūdu “0xc000000e”, izmantojot iebūvēto automātiskā remonta opciju. EasyRE pašlaik ir pieejams operētājsistēmām Windows XP, Vista, 7, 8, 10, un to var lejupielādēt un izveidot uz jebkura datora.
- Iegūstiet citu datoru, kuru varētu izmantot, lai izveidotu USB, no kura mēs izmantosim datora sāknēšanu.
- Lejupielādējiet Easy Recovery Essentials šeit.

- Dedziniet attēlu.
- Sāknējiet datoru no izveidotā kompaktdiska Easy Recovery Essentials vai USB.
- Kad EasyRE darbojas, izvēlieties opciju “Automātiskais remonts” un noklikšķiniet uz Turpināt.
- Pēc tam, kad EasyRE ir skenējis datora diskus, sarakstā identificējiet un atlasiet diska burtu Windows instalēšanai un pēc tam noklikšķiniet uz Automātiskā remonta opcija.
- Easy Recovery Essentials sāks analizēt izvēlēto disku problēmu novēršanai. EasyRE pārbaudīs un mēģinās automātiski izlabot kļūdas diskā, nodalījumā, bootectorā, failu sistēmā, bootloader un reģistrā. Iejaukšanās nav nepieciešama, jo EasyRE remonts ir pilnībā automatizēts.
- Kad process būs pabeigts, EasyRE ziņos par saviem atklājumiem. Noklikšķiniet uz pogas Restartēt , lai restartētu datoru un pārbaudītu izmaiņas.

5. metode: atiestatīt BIOS / UEFI konfigurāciju
Some users said that their error 0xc000000e issue is solved by resetting the BIOS/UEFI configuration. So, you can consider trying this method to see whether this issue can be solved.
Step 1. Open BIOS Menu
To reset BIOS to default settings, you need to access the BIOS menu and find the Default Settings option first.
Windows 10 users can access advanced startup options Windows 10 and get into the BIOS menu. You can click Start -> Power, press and hold the Shift key, and click Restart button to reboot Windows into Windows Recovery Environment. Then click Troubleshoot -> Advanced Options -> UEFI Firmware Settings, and click Restart to enter into the BIOS settings screen.
Alternatively, you can also restart your computer normally and press the required key in the startup screen to boot into the BIOS settings window. The hotkey is varied from different computer manufacturers, and it could be F12, Del, Esc, F8, F2, etc.
Step 2. Find the Setup Defaults Option
The name and location of the “Setup Defaults” option may be different from various computers. It generally calls like: Load Default, Load Setup Defaults, Load Default Settings, Load BIOS Defaults, Load Optimal Defaults, etc.
Use the arrow keys on the computer keyboard to find the BIOS setup default option in the BIOS settings screen. You may find it in one of the BIOS tabs.
Step 3. Reset BIOS
After you find the Load Setup Defaults option, you can select it and press the Enter button to start resetting the BIOS to factory default settings in Windows 10.
At last, you can press F10 to save and exit BIOS. Your computer will automatically reboot. If you need to change BIOS settings again in the future, you can follow the same instructions to access BIOS again to change it.
Method 6: Mark Boot Disk As Online
It is possible in some cases, that the disk that you have connected to the computer or the USB that you are trying to boot from has been marked as offline by the computer. Some computers tend to prevent extra applications, hardware, and other things from being able to run as soon as the computer starts because it allows for more convenient and fast startup experience. Therefore, in this step, we will be marking the Disk as online.
You still need to use a bootable USB medium to do this job. We will show you a step-by-step guide here:
- After booting your computer from the bootable USB drive, you need to go to Next > Repair your computer. Then, you will enter WinRE.
- Go to Troubleshoot > Advanced options > Command Prompt.
- Make sure to properly enter your login credentials if you are asked by the computer.
- Type in the following command inside the command prompt to successfully launch the disk part utility on your computer.
diskpart
- Type in either one of the following commands in the next window to list the currently connected disk drives to your computer.
List Disk List Volume
- Once the disks have been listed, you need to identify the disk that contains the Windows operating system and the one that you want to mark as active.
- After identifying it, select the disk using the following command and replacing the alphabet with the driver letter of that disk.
select disk A Select Volume A (Replace A with the Drive Letter)
- After you have successfully selected the disk, you must mark the disk as online in order to initiate the recognization process of the disk at startup. Use the following commands to do that.
Online Disk Online Volume
- Type in the following command to successfully get out of the command prompt and restart your computer after that.
Exit
- Check to see if marking the Disk as online has fixed your issue.

Method 7: Check your data cables, BIOS and drivers
Unplug all HDD data cables, and then plug them again. Revert to the previous drivers and BIOS settings if they were changed, or use “Restore factory settings” option in the BIOS. Make sure to write down all current BIOS settings that were previously selected, just in case it is required to switch back. If the error is caused by a change of the SATA disk controller’s mode in the BIOS or firmware, the fix can be as simple as entering the BIOS and toggling the SATA controller’s “mode” setting. The exact instructions differ from one manufacturer to the other, but the options will resemble what is shown in the screenshots below.
To check the boot order, follow these steps:
- Restart the computer
- Press the necessary key to open the BIOS menu. This key depends on the computer manufacturer and computer model. This is usually listed on the first screen that appears on the monitor. It can be any of the following: Esc, Del, F2, F8, F10 or F12.
- If the screen shows multiple keys, find the key to open “BIOS”, “setup” or “BIOS menu”
- Attempt to toggle between all three (or more) modes until a combination that results in Windows booting successfully once more is found.
Method 8: Boot Windows In Safe Mode
If above solutions didn’t fix the problem, then Start Windows into safe mode. This will start your PC with minimum system requirements, will not load startup programs, add-ons etc. And allow performing troubleshooting steps to fix Boot Error 0xc000000e:
Before you enter the safe mode, you need to enter the Windows Recovery Environment (winRE). To do this, you will repeatedly turn your device OFF, then ON:
- Hold down the power button for 10 seconds to turn off your device.
- Press the power button again to turn on your device.
- On the first sign that Windows has started (for example, some devices show the manufacturer’s logo when restarting) hold down the power button for 10 seconds to turn off your device.
- Press the power button again to turn on your device.
- When Windows restarts, hold down the power button for 10 seconds to turn off your device.
- Press the power button again to turn on your device.
- Allow your device to fully restart and you should boot into the Windows Recovery Environment.
Now that you are in the Windows Recovery Environment, you will follow these steps to take you to safe mode:
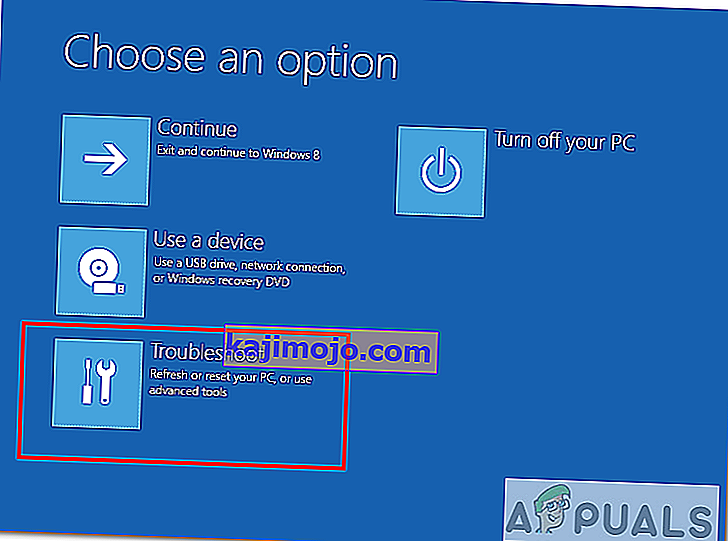
- On the Choose an option, screen, select “Troubleshoot” and then “Advanced options.”

- Now click on “Startup Settings” and click on “Restart.”
- After your device restarts, you’ll see a list of options. Select option “4” from the list or press “F4” to enter Safe Mode.

Note: If you need to exit safe mode, simply restart your device, or:
- Press the “Windows logo key + R.”
- Type “msconfig” in the Run box and then select “OK”.

- Select the Boot tab and under Boot options, clear the Safe boot checkbox.

Method 9: Check your disk with CHKDSK utility
If the hard drive has its file integrity compromised, it is possible to use built-in Windows CHKDSK utility to scan the disk and fix the file system errors.
- Connect a USB drive that has been made bootable or insert the Windows Installation Disk on your computer.
- After connecting one of these, boot from that connected device.
- After booting your computer from the device, click on “Next” and then on the “Repair your Computer” option.
- On the next window, click on “Troubleshoot” and then on the “Advanced” Option.

- On the next screen, make sure to select the “CommandPrompt” option to successfully launch into the command prompt.
- Provide the login credentials of your account in order to boot inside the cmd.
- Inside the command prompt, type in the following command to successfully run the check disk utility on your computer.
chkdsk C: /f (Make sure to replace the "C" with the Drive letter of your partition).
- Confirm any on-screen prompts and wait for the scan to be fully completed.
- Check to see if the issue is fixed by performing this step.
Method 10: Disable fast startup Feature
If your computer has been set up to use the Fast Startup feature, you might be getting this error message on your screen because of doing so. The Fast Startup feature is known to malfunction with some operating systems and hardware combinations.
Basically, when enabled, the feature automatically sends some launch configurations to be stored in your RAM to allow for a faster startup as indicated by its name but this configuration data can sometimes be corrupted which can lead to this error on your computer. Therefore, in this step, we will be disabling it completely. For that:
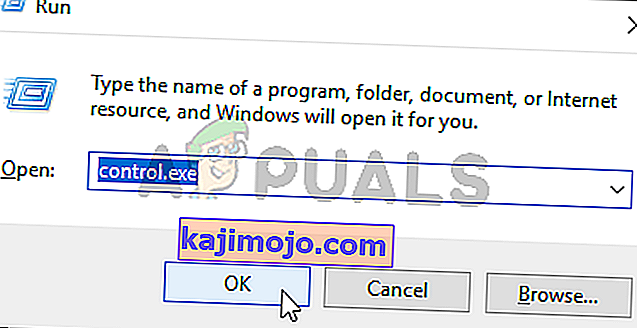
- Press “Windows” + “R” to open the Run prompt.
- Type in “Control Panel” and press “enter” to launch the classical Control Panel interface.
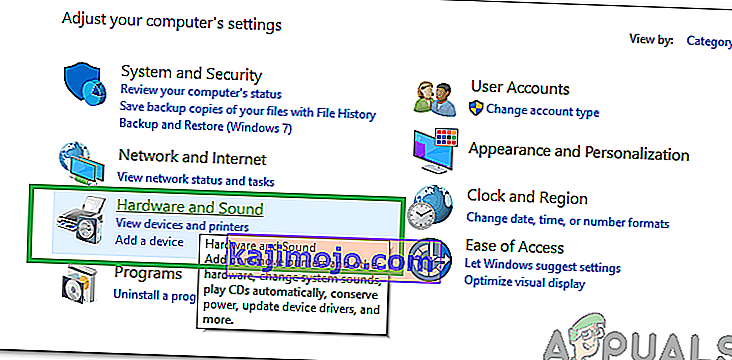
- Inside the control panel, click on the “Hardware and Sound” option and then select the “Power Options” button.
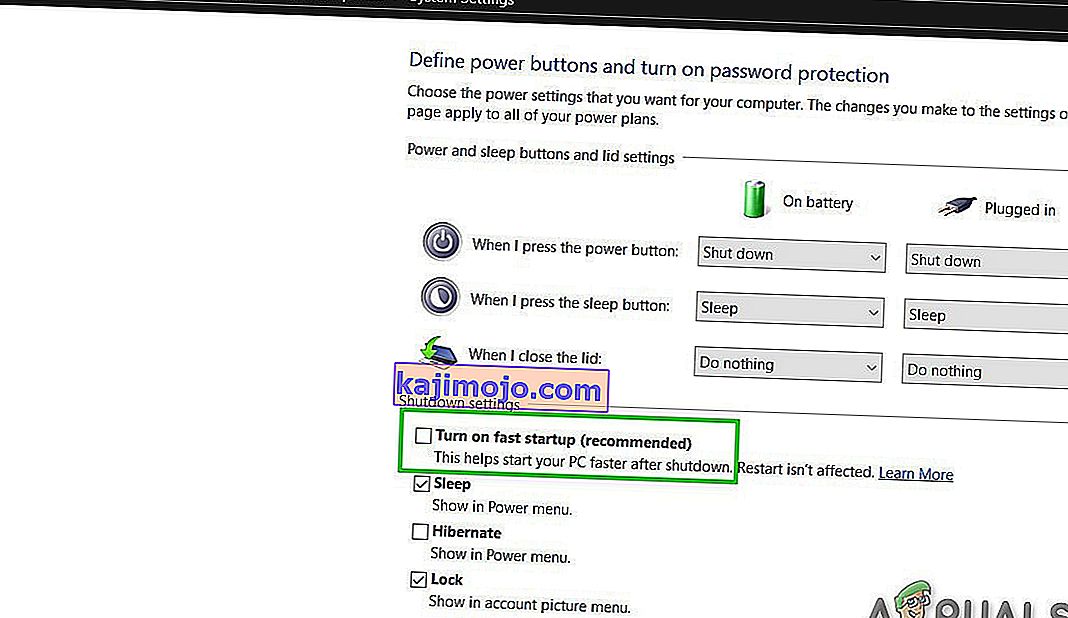
- Inside the power options, click on the “Choose what the power button does” from the left side.
- Click on the “Change Settings” option if the fast startup option is greyed out.
- Make sure to uncheck the “Turn on Fast Startup” option and save your changes.
- Closeout of the window and terminate any unnecessary applications.
- Click on the “Start Menu”, click on the “Power Options” and select “Shutdown” from the list.
- This option should completely power down your computer and after performing a complete shutdown, wait for some minutes before turning your computer back on.
- After the computer turns back on, check to see if the error message is fixed.
Note: This solution can only be applied if you are able to sometimes boot up your computer normally and are only encountering this error momentarily.


Method 11: Repair Corrupted System Files
It also possible in some situations that certain system files might have been corrupted due to a storage failure or due to some other reason. Therefore, in this step, we will be performing a complete repair of the corrupted system files and then we will check to see if doing so fixes this issue. For that:
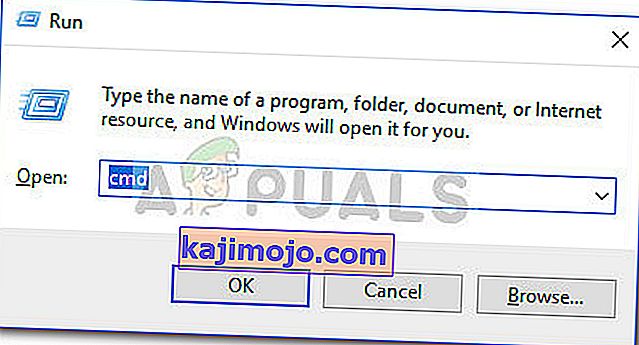
- Press “Windows” + “R” to open the Run prompt.
- Type in “cmd” and then press “Shift” + “Ctrl” + “Enter” to launch the command prompt with admin privileges.
- Type in the following commands one by one and press “Enter” after each to successfully run an SFC scan and a DISM Scan on your computer.
DISM /Online /Cleanup-Image /RestoreHealth sfc /scannow
- Restart your computer completely once these scans are completed.
- Check to see if by performing these scans, you were able to fix this issue on your computer.

Method 12: Run Windows Startup Repair
Startup Repair is capable of diagnosing and fixing the found issues. For example, it can automatically scan system files, registry settings, configuration settings, etc. and try to fix the problem on its own. Startup Repair is especially useful when your computer is unbootable. Since your computer fails to boot, Windows can boot into WinRE automatically. While, if it doesn’t appear, you can interrupt the boot process three times in a row, and then the WinRE screen appears. Alternatively, if you have a bootable USB medium, you can also set your computer to boot from it and go to Repair your computer to enter WinRE.
After you have successfully booted into the Windows Recovery Environment, click on the “Troubleshoot” option, and from there, select the “Advanced Options” screen. Inside the advanced options, select the “StartupRepair” button to successfully initiate the Startup Repairing process. Windows will begin to diagnose your computer automatically. When the process ends, your computer will restart automatically. You can wait to see whether it can boot successfully.

Risinājums: Pirms lēkšanas komandrindā vai startēšanas labošanā pārliecinieties, vai nav pievienotas papildu ierīces, vislabāk ir mēģināt vēlreiz restartēt, ja datorā ir pievienots vismazākais ierīču un ārējo disku skaits. Tas nodrošinās, ka nekas, kas nesen tika pievienots datoram, neizraisa šo problēmu. Vislabāk būtu atvienot visus jaunākos USB diskus, kompaktdiskus, DVD diskus utt. Tas ietver arī atmiņas karšu lasītāju. Pārliecinieties, vai ir atvienoti visi ārējie diski un USB atslēgas vai USB lēcas, un pēc tam mēģiniet vēlreiz.