Steam Cloud nodrošina ērtu un pārredzamu veidu, kā saglabāt spēļu datus attālajā glabāšanas sistēmā. Auto-Cloud konfigurācijā norādītie faili vai, ja tie ir ierakstīti diskā, pēc spēles pastāvēšanas automātiski tiks atkārtoti mākoņa serveros Steam (izmantojot Cloud API).

Tas ir īpaši noderīgi, ja lietotājs maina datoru. Spēles gaitu atsāks vai nu Cloud API, vai arī lasīšana tieši no diska. Faili tiks automātiski lejupielādēti pirms spēles uzsākšanas, jo jūs jau būtu ievadījis savus Steam akreditācijas datus. Steam Cloud galvenais uzdevums ir nodrošināt visu failu sinhronizāciju visos datoros, kurus lietotājs izmanto.
Lietotājiem ir iespēja atspējot visu mākoņa sinhronizāciju, kas atrodas klienta tvaika iestatījumos. Lietotāji var arī elastīgi atspējot mākoņa sinhronizāciju katrā spēlē. Bet pirms turpināt risinājumus, atjauniniet Steam klientu uz jaunāko versiju.
Kādas ir dažādas tvaika mākoņa izmantošanas metodes?
Steam piedāvā divas dažādas metodes, kā izmantot Steam Cloud.
Pirmais ir Steam Cloud API. Cloud API nodrošina virkni funkciju, kas ļauj tieši integrēt Steam Cloud savā spēlē. Cloud API veic arī uzdevumu izolēt atsevišķus Steam lietotāju failus viens no otra, kā arī nodrošina labāku kontroli pār Steam Cloud kopumā.
Otrais ir Steam Auto-Cloud. Šī funkcija galvenokārt tika paredzēta mantotajām spēlēm, kurās bija grūti izmantot Cloud API. Tas ir ātrs veids, kā sākt darbu ar Steam Cloud, taču tam trūkst elastības un jaudas, ko nodrošina Steam Cloud API.
Izstrādātāji iesaka Steam Auto-Cloud vietā izmantot Cloud API, jo tas nodrošina dziļāku un efektīvāku integrāciju un pielāgošanu. Tas ļauj jums maksimāli izmantot Steam mākoni.
Kā atrisināt Steam Cloud konfliktu?
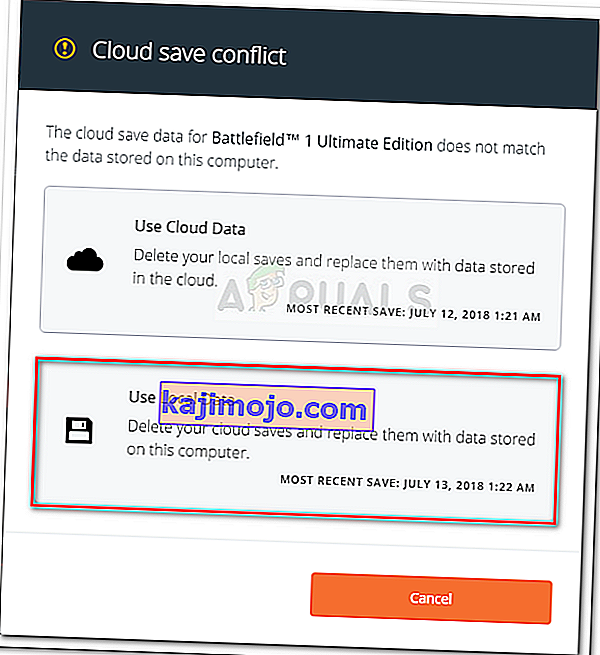
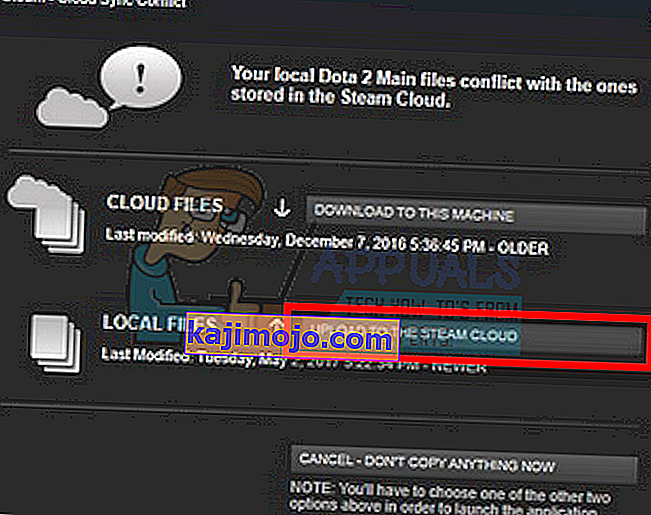
Steam Cloud konflikts rodas, ja Steam Cloud saturs neatbilst jūsu vietējiem spēļu failiem, kas saglabāti jūsu cietajā diskā. Tas var notikt mašīnā, kuru tajā laikā izmantojāt, vai tas var būt noticis citā mašīnā iepriekš. Tā kā fails tika modificēts divās dažādās vietās bez sinhronizācijas starp tām, Steam nevar noteikt, kuru failu saglabāt.

Visticamāk, jūs izvēlēsieties failu, kas tika modificēts nesen. Tas nozīmē, ka tiks saglabāti jūsu spēles jaunākie sasniegumi. Jums rūpīgi jāpārbauda logā priekšskatītie dati. Rūpīgi pārskatiet konteksta datumu un laiku un saskaņojiet to ar pēdējo reizi, kad spēlējāt spēli Steam. Šis konteksts var jums palīdzēt noteikt, kura versija saglabāt.
Ņemiet vērā, ka spēlējot spēles bezsaistes režīmā, jūsu spēles netiks sinhronizētas, un tas ir visticamākais Steam Cloud konflikta cēlonis.
Ko darīt, ja Steam nevar sinhronizēt failus ar mākoņu?
Šī kļūda norāda, ka Steam nevarēja sinhronizēt vietējos failus ar Steam Cloud. Tā var būt īslaicīga problēma, ar kuru var saskarties Steam Cloud serveri. Steam vietnē varat pārbaudīt Steam Cloud statusu, lai pārliecinātos, ka problēma ir viņu pusē.

Ja mākoņa pakalpojums Steam darbojas un darbojas nevainojami, tas nozīmē, ka problēma ir jūsu galā. Jūs varētu pārbaudīt Steam savienojumu un novērst problēmas. Varat arī pārbaudīt, vai tikai jums ir problēmas sinhronizēt ar Steam Cloud.
Ja jūs ignorējat ziņojumu un noklikšķiniet uz “Spēlēt spēli”, tas var izraisīt iespējamu konfliktu starp jūsu vietējiem failiem un Steam Cloud. Tā rezultātā var arī zaudēt progresu un spēļu datus.
Ko darīt, ja es zaudēju failu vai progresu pēc pārejas uz citu datoru?
Ja jums trūkst pēdējās norises un esat vēlreiz pārbaudījis, vai spēle izmanto Steam Cloud, izmantojot iestatījumus, tas nozīmē, vai nu Steam nevarēja veiksmīgi sinhronizēt jūsu datus, vai arī sinhronizācijas rezultātā jūsu iepriekšējie dati tika augšupielādēti Mākonis.
Iespējams, ka jūsu sākotnējais fails vai progress joprojām ir vecākā mašīnā un nevarēja sinhronizēt. Tas ir iespējams, ja šajā datorā palaižat Steam, tiks parādīts jūsu progress. Ja tas notiks, tas tiks automātiski atjaunināts visās pārējās mašīnās, kas saistītas ar jūsu Steam kontu.
Arī daudzās spēlēs netiek izmantota Steam Cloud iespēja. Ja ir pieejams Steam Cloud atbalsts, varat pārbaudīt spēles oficiālo lapu. Ja tā nav un jums nav piekļuves vecākai mašīnai, tas nozīmē, ka jūsu progress tiek zaudēts un nav iespējas to atgūt.
Kā izdzēst Steam Cloud serveros glabātos failus?
Steam Cloud tiek izmantots, lai dublētu katru jūsu spēles progresu, lai nezaudētu progresu, ja piekļūstat spēlei no jebkura cita datora. Izmantojot šo metodi, varat apstiprināt, ka mākonis saglabā jūsu progresu.
Pārbaudiet, vai jūsu spēle tiek dublēta.
- Atveriet savu Steam klientu . Atveriet tā iestatījumus , nospiežot pogu Steam loga augšējā kreisajā stūrī un atlasot opciju.
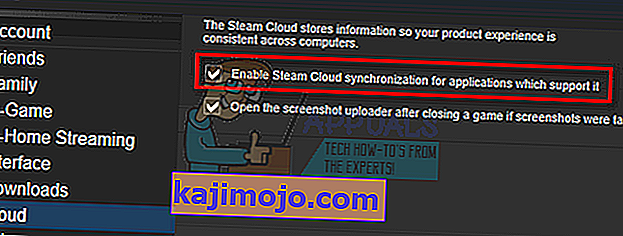
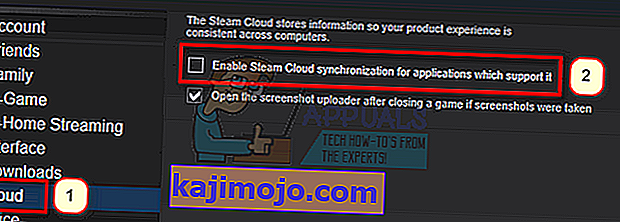
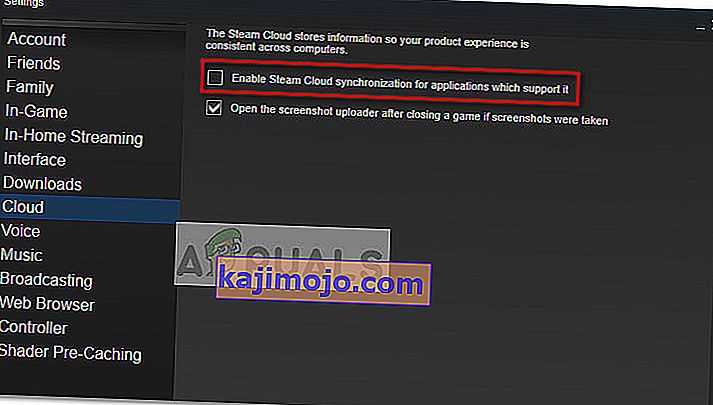
- Atveriet cilni Mākonis , kas atrodas ekrāna kreisajā pusē. Pārbaudiet, vai ir atzīmēta opcija “ Iespējot Steam Cloud sinhronizāciju lietojumprogrammām, kuras to atbalsta ”.
- Pēc tam noklikšķiniet uz cilnes Bibliotēka, kas atrodas Steam klienta augšpusē. Šeit tiks uzskaitītas visas jūsu spēles.
- Ar peles labo pogu noklikšķiniet uz spēles un atlasiet Rekvizīti . Pēc tam pārejiet uz cilni Atjauninājumi, kas atrodas loga augšdaļā.
- Šeit loga apakšdaļā redzēsiet opciju “ Iespējot Steam Cloud sinhronizāciju [spēles nosaukums] ”. Pārliecinieties, vai opcija ir atzīmēta .


Ja jums ir iespējotas abas opcijas, tas nozīmē, ka jūsu spēli dublē Steam Cloud, un mēs varam arī izdzēst datus.
Kas ir rezerves mehānisms?
Vispirms jums jāzina, ka ir trīs saglabāto spēļu datu versijas
- Sākotnējā versija tiek saglabāta AppData mapē ( D1 ).
- Mākoņa versija tiek saglabāta atrašanās vietā Steam / userdata / SteamID / AppID ( D2 ).
- Mākoņa versija, kas saglabāta Steam mākoņu serveros ( D3 ).
Atzīmējiet izmantotās anotācijas (D1, D2, D3), jo nākotnē uz tām daudz atsaucamies.
Sākot spēli pirmo reizi, D1 tiek izveidots automātiski. Pēc spēles beigām spēle D1 tiek atjaunināta un automātiski kopēta D2. Pēc tam D2 tiek sinhronizēts ar D3, tādējādi augšupielādējot visu spēles saturu.
Ja pirmo reizi sākat spēli no cita datora, ja Steam serveros ir D3, bet D2 datorā netiek atklāts, tas automātiski lejupielādēs datus un kopēs D3 uz D2. Steam Cloud arī automātiski lejupielādē trūkstošos datus ikreiz, kad startējat Steam.
Īsumā mums vissvarīgākie dati ir D2. Ja mēs varam ar to manipulēt, mēs varam veiksmīgi izdzēst datus, kurus vēlaties izdzēst.
Piezīme: Dažām spēlēm nav D1, un tās tieši saglabā savus datus D2. Kaut arī dažās spēlēs neizmanto D2 kā datu nesēju un augšupielādē datus mākonī tieši no D1.
What Are the Userdata Contents?
In the directory Steam/userdata, you should have a folder corresponding to your SteamID (You check what your Steam ID is by reading our article on it). After you open it, there will folders made for each game that you play. They will be identified using their AppID (AppID can be easily checked by visiting the game in the Steam store and extracting it from the URL). In this game folder, you will find two entities.
- remotecache.vdf: This file describes all the properties of files that are contained in the remote folder.
- Remotefolder. This contains all the files which are synced with your Steam Cloud server.
Deleting Data from Cloud
In this method, we will be following two important steps. We will first bring up the Steam Cloud conflict notification and then delete the Cloud files.
Do note that you would have to follow these steps game by game to delete all of the Steam cloud content.
First, we need to delete the AppID folder from your Steam directory. After you restart your computer and Steam, Steam will automatically re-create the folder. We need to perform this step to ensure that the Steam Cloud is working perfectly and we can go ahead with the part of deletion.
- Open your Steam directory. The default location for your Steam installation is
C:\Program Files (x86)\Steam
- Search for a folder of AppID and Delete it. Then restart your computer and Steam. Start a game for a few minutes. Make sure that you have a working internet connection.
- Navigate back to the Steam directory and check if the AppID folder is back. If it is, it is confirmed that your Steam Cloud is working perfectly and we can proceed with the method.
Bringing Up Steam Cloud Conflict Dialogue
The first part of the solution is probably the most difficult. To delete all your Steam Cloud data, it is necessary to bring the conflict dialogue. Without it is not possible to delete the data present in your Cloud. Steam Cloud conflict occurs when the Cloud files differ from the data present on your hard drive.
There are two methods to bring about this conflict:
Method 1:
- Make sure that your Steam Cloud is enabled by following the steps mentioned above. Exit Steam completely by ending all the processes starting with Steamclientbootstrapper using the task manager.
- Now will alter all the files in the location
Steam\userdata\SteamID\AppID\remote
The objective is to make sure that all the files are different from those uploaded to the Steam cloud. We can’t simply delete the files from this location as Steam will automatically notice that the files are missing and download the same ones from the Cloud servers. We can achieve our task by corrupting them and making them 0-byte files.
- Navigate to
Steam\userdata\SteamID\AppID\remote
- Now hold shift and right-click on your remote folder. Select the option “Open PowerShell window here”.
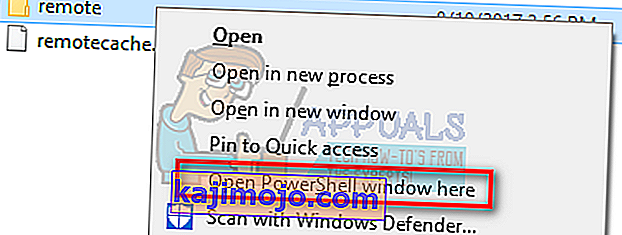
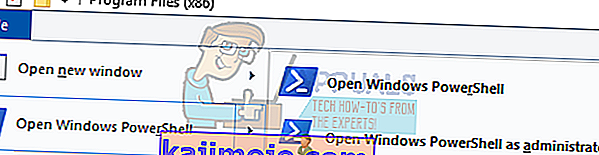
- You can also open PowerShell when in the folder by clicking the File option present at the top left side of the screen and selecting “Open Windows PowerShell as administrator”.
- Once PowerShell is opened, type the exact text written below


clc –path “C:\Program Files (x86)\Steam\userdata\SteamID\AppID\remote\*"
If you fail to write the correct code, you will get an error like this

If you correctly type in the line there will be no confirmatory message and you will get a window like this.

Start your Steam and there will be the conflict windows present on your Steam client.
Method 2:
This is an easier method as compared to the earlier one but it isn’t that efficient.
- Open your Steam client. Open its Settings by pressing the Steam button present at the top left corner of the window and selecting the option.
- Open the Cloud tab present on the left side of the screen. Uncheck the option “Enable Steam Cloud synchronization for the applications which support it”.

- Now navigate to your Stream directory as you did earlier and delete all files present in the folder of AppID. The file path for deletion is
Steam\userdata\SteamID\AppID.
- Now start the game to make new and different files in the file location.
- Exit the game and Steam completely by ending all Steam processes in the task manager (end steamclientbootstrapper first).
- Now delete the remotecache.vdf file present in the location
Steam\userdata\SteamID\AppID
- Start your Steam.
- Head over to the client’s Settings and enable the cloud.

Now a Steam conflict dialogue will come forth and we can proceed with the remaining method.
Deleting Cloud files
Once the Cloud conflict error is forth, don’t click any option and follow the instructions below.
- Navigate to the following file path
Steam\userdata\SteamID\AppID
and delete all the files in it. There will be two files (remote folder and remotecache.vdf). Delete both of them.

- Now go back to the conflict window and select the option of “Upload to the Steam Cloud”. Now Steam will sync your AppID folder while there will be nothing in it and the previous data on your Steam Cloud will be deleted.
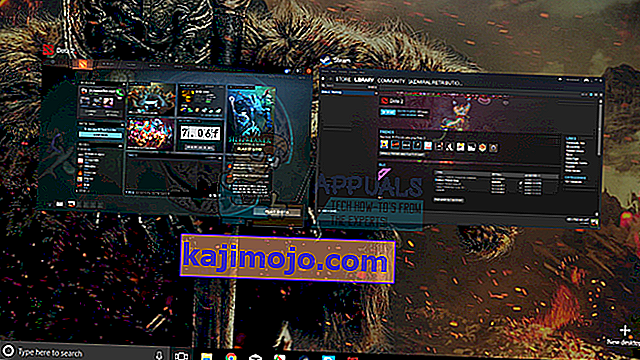
- Now the game will start automatically but it will create new files that will be synced to your Steam cloud when you close it. We can prevent it from happening by pressing alt + tab. This will open the open windows on your screen. Select the Steam client from the list of windows.
- Once you are in the Steam client, open the client’s Settings. Navigate to the Cloud tab and uncheck the line which enables cloud.
- Now return to the game and exit. No files will be synced to your Steam cloud.
- Exit Steam and delete the AppID folder as we did before.


How to Make Sure If it Worked?
Remember how we checked at the beginning of this method if the Steam Cloud was running as expected by deleting the AppID folder and checking if it was made again. If there is no file present in the Steam cloud, there will be no file downloaded to your computer.
- Enable the Steam cloud as we did in the guide.
- Exit Steam completely by using the task manager.
- Delete the AppID folder (if you didn’t in step 2).
- Now check D3 (these are the cloud files) and compare them with D2 (local files on your computer). If there is nothing in D3, there will be nothing in D2 too!
- Check the following directory Steam\userdata\SteamID
No new AppID folder would have been created.
You can also check by logging Steam in on another computer and checking if the files exist.
If you make it till here without any problems, you have successfully deleted all the files on your Steam Cloud.
How to Delete Steam Cloud Saves from OS X
The procedures above can also be replicated on OS X and older Macs to a slight extent. By following the steps below, you will be able to delete your local saves. You can then disable the Steam Cloud synchronization from the Steam application, start a new game and create a few new saves. Then, when you return to re-enable the Steam Cloud synchronization features, the client will ask you which saves do you want to use. You can then choose the new ones which will delete and replace your old saves from the cloud.
To make things even clearer, here’s a step-by-step guide through the whole thing:
- Open your Steam application and go to Steam > Settings via the ribbon at the top of the window.
- In the settings menu, click on the Cloud tab and uncheck the box associated with Enable Steam Cloud synchronization for applications that support it.
- Close Steam completely and open your Finder app.
- Go to Library > Application Support > Steam > SteamApps > Common and open the folder of whichever game you want to delete the save files.
- Next, open the SAVE folder to reveal the saves of the game.
Note: If the location specified above doesn’t land you to the save files, try the following locations but mind the placeholders:
Users / *Your username* /Library / Application Support / *Game Folder* / Game Documents / *Game* / GameSaves Users/ *Your username* / Library / Application Support / Steam / userdata / *GameNumber* / remote Users/ *Your username* / Library / Containers / *Game Folder* / Data /Library / Application Support / *Game* / GameDocuments / *Game* / gamesaves
- Once you manage to identify and delete the local saves from the game you’re targeting, open the Game and create a few new saves.
- Exit the game, open steam and return to Steam > Settings > Cloud. From the cloud tab, re-enable the checkbox next to Enable Steam Cloud synchronization for applications which support it and click the OK button below.
- Steam will ask you whether you want to use the newly created local saves or the ones that you already have on the cloud. Choosing to use the new ones will delete the old saves that you currently have on Steam Cloud.