OBS Studio ir atvērtā koda programmatūra, kas lietotājiem ļauj profesionāli straumēt savas spēles vai ekrānus. Tam ir platformas gan macOS, gan Windows operētājsistēmai. OBS parasti izmanto augstas klases spēlētāji, kuri izvēlas lielāku kontroli pār ekrāna koplietošanu, salīdzinot ar parasto ekrāna ierakstīšanas programmatūru.
Problēma jau ilgu laiku ir nomocījusi OBS, kad lietotāji mēģina dalīties ar ekrāniem tiešsaistē, izmantojot “melno ekrānu”. Šis jautājums galvenokārt tiek novērots Windows platformās un sistēmās, kur ir divas grafikas opcijas, ti, abas ir veltītas un integrētas. Šajā rakstā mēs aplūkosim visus risinājumus, kāpēc šī problēma rodas un kādi ir soļi, lai to atrisinātu.
Kas izraisa melno ekrānu OBS studijā?
Mēs veicām plašu aptauju un analizējām visus lietotāju gadījumus, kad straumējot, izmantojot OBS, radās melnais ekrāns. Pamatojoties uz mūsu analīzi, mēs sastapāmies ar vairākiem dažādiem vainīgajiem, kuri varētu izraisīt šo problēmu. Daži no tiem ir uzskaitīti šeit:
- Īpaši traucējoši grafikas attēli: ikreiz, kad startējat kādu lietojumprogrammu vai spēli, operētājsistēmai ir jāizlemj, vai piešķirt resursus no īpašās grafikas kartes vai caur parasto integrēto mātesplatē. Šai atlasei varētu būt nelabvēlīga ietekme uz darbības mehāniku, un OBS, iespējams, nevarēs pareizi straumēt.
- Administratora privilēģijas: Tā kā OBS koplieto visu jūsu ekrānu, var būt daži gadījumi, kad dators var ierobežot piekļuvi un tādējādi tas, iespējams, nevar parādīt jūsu saturu. Parasti tikai palaižot lietojumprogrammu ar administratīvo piekļuvi, problēma tiek atrisināta uzreiz.
- Konflikts ar 32 un 64 bitu lietojumprogrammām: OBS ir divas lietojumprogrammu versijas, proti, 32 un 64 biti. Pareiza versija jāizvēlas atkarībā no datorā instalētās operētājsistēmas veida. Ja tā nav, lietojumprogramma nebūs saderīga un tā nedarbosies pareizi.
- Saderības problēmas: mēs arī saskārāmies ar vairākiem gadījumiem, kad OBS nebija saderīgs ar jaunāko Windows versiju. Šeit lietojumprogrammas palaišana saderības režīmā liek lietojumprogrammai startēt un darboties, kā paredzēts.
- Overclocking: Overclocking var uzlabot datora veiktspēju, taču tam ir arī nelabvēlīga ietekme uz lietojumprogrammām. Jūs varat mēģināt atspējot overclocking un pārbaudīt, vai tas kaut ko labu šai problēmai.
- Konfliktu programmatūra: fonā var būt arī cita līdzīga uztveršanas programmatūra. Šī programmatūra var būt pretrunā ar OBS un izraisīt konkurenci par resursiem, kas noteikti izraisīs OBS nepareizu darbību un nedarbosies pareizi.
- Tveršanas opcijas: OBS ir pieejamas vairākas tveršanas iespējas, piemēram, pilnekrāna vai īpašs logs utt. Tverot saturu, jāizvēlas pareizais.
- Dators kļūdas stāvoklī: nekad nevar izslēgt datora iespēju kļūdas stāvoklī. Parasti tas notiek, ja ilgu laiku neesat izslēdzis datoru. Vienkārši braucot ar velosipēdu, problēma tiek atrisināta.
Noteikti sekojiet risinājumiem no augšas un efektīvi virzieties uz leju. Tie ir sakārtoti pēc grūtības un efektivitātes. Priecīgu problēmu novēršanu!
1. risinājums: barojiet datoru ar strāvas padevi
Pirms sākam plašu problēmu novēršanu, ir vērts ar datoru darbināt ar enerģiju. Bija vairāki gadījumi, kad vienkārši braucot ar motoru, OBS melnais ekrāns tika atrisināts uzreiz. Barošana ar enerģiju ietver pilnīgu datora izslēgšanu un tā barošanas avota noņemšanu. Tas liek datoram noņemt visas pagaidu konfigurācijas, tāpēc ikreiz, kad to palaižat no jauna, viss tiks inicializēts jauns.
- Pareizi izslēdziet datoru.
- Kad tas ir izslēgts, izņemiet strāvas kontaktligzdu vai, ja izmantojat klēpjdatoru, izņemiet akumulatoru .
- Tagad pāris sekundes turiet nospiestu barošanas pogu. Tas nodrošinās visas strāvas novadīšanu.
Pēc 2–4 minūšu gaidīšanas pievienojiet visu atpakaļ un pārbaudiet, vai problēma tiek atrisināta.
2. risinājums: izvēlieties pareizo OBS Studio versiju
OBS parasti ir divās versijās, ti, 32 un 64 biti. Programmatūra tiek piegādāta divās versijās, jo arī Windows operētājsistēma tiek piegādāta divās versijās. Liela atšķirība starp 32 bitu un 64 bitu procesoriem ir to veikto aprēķinu skaits sekundē, kas ietekmē ātrumu, kādā viņi var izpildīt uzdevumus. Šajā risinājumā mēs virzīsimies uz OBS instalācijas direktoriju un pēc bitu versijas pārbaudes atlasīsim pareizo programmatūras versiju.
Pirmkārt, mēs pārbaudīsim jūsu datorā instalēto operētājsistēmas versiju.
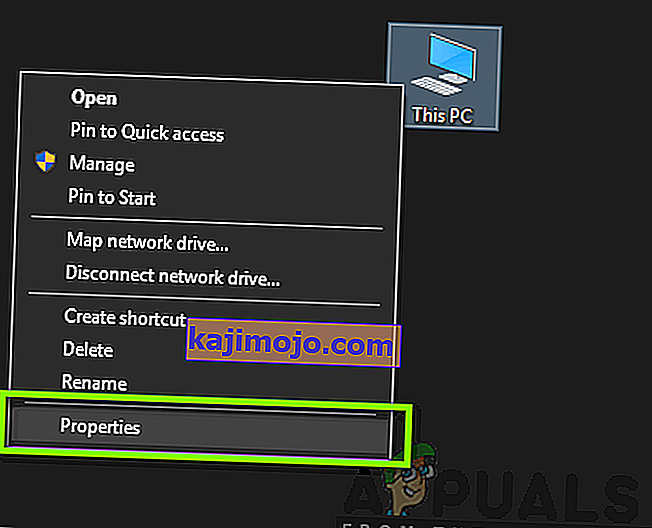
- Ar peles labo pogu noklikšķiniet uz Šis dators un atlasiet Rekvizīti .
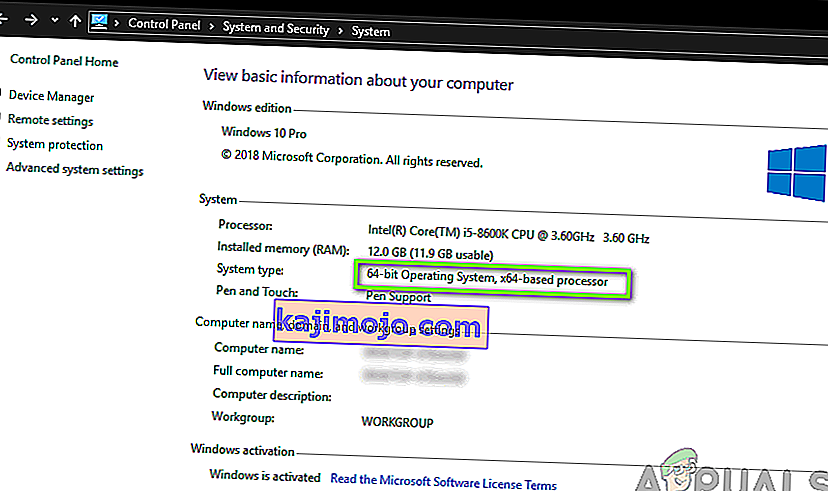
- Kad esat nokļuvis datora rekvizītos, pārbaudiet zem Sistēmas apakšvirsraksta un pārbaudiet veidu Sistēmas tips priekšā . Pierakstiet operētājsistēmas tipu un turpiniet tālāk sniegtos norādījumus.
Tagad mēs virzīsimies uz OBS instalācijas mapi un palaidīsim pareizo lietojumprogrammas versiju atbilstoši datora bitu arhitektūrai.
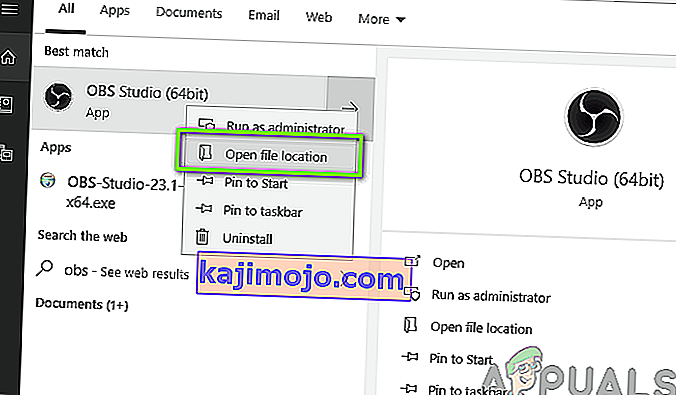
- Nospiediet Windows + E, lai palaistu failu pārlūku. Tagad dialoglodziņā meklējiet OBS un atveriet faila atrašanās vietu, kā parādīts attēlā.
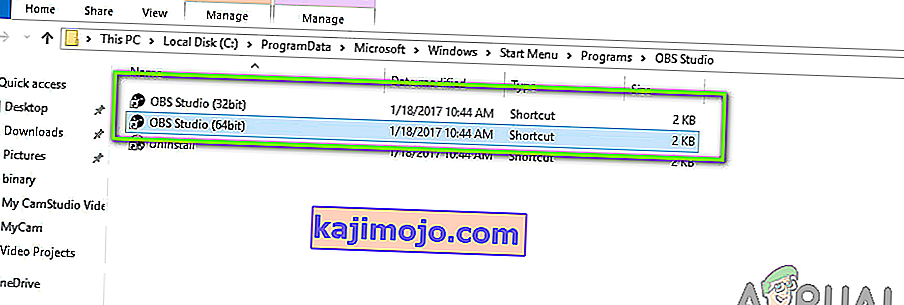
- Tagad atlasiet un atveriet pareizo lietojumprogrammas versiju atkarībā no OS bitu versijas. Pārbaudiet, vai problēma ir atrisināta.
3. risinājums: saderības režīma maiņa
Mēs saņēmām jauktus ziņojumus par lietojumprogrammā esošo saderības režīma opciju. Pēc dažu lietotāju domām, lietojumprogramma neatbalstīja jaunāko Windows versiju, tāpēc viņiem bija jāmaina saderība ar Windows 7, savukārt daži lietotāji ziņoja, ka saderības režīma atspējošana problēmu atrisināja uzreiz. Šeit jūs varat izmēģināt abas metodes un pārbaudīt, kura no tām jums ir piemērota. Ja tas nenotiek, atjaunojiet iestatījumu pēc noklusējuma un pārejiet pie citiem risinājumiem.
- Nospiediet Windows + S, meklējiet OBS, ar peles labo pogu noklikšķiniet uz lietojumprogrammas un atlasiet Atvērt faila atrašanās vietu .
- Tagad ar peles labo pogu noklikšķiniet uz izpildāmā faila un atlasiet Rekvizīti .

- Kad esat rekvizītos, atlasiet cilni Saderība un atzīmējiet opciju Palaist šo programmu saderības režīmā . Tagad jūs varat izvēlēties Windows 7 vai 8.
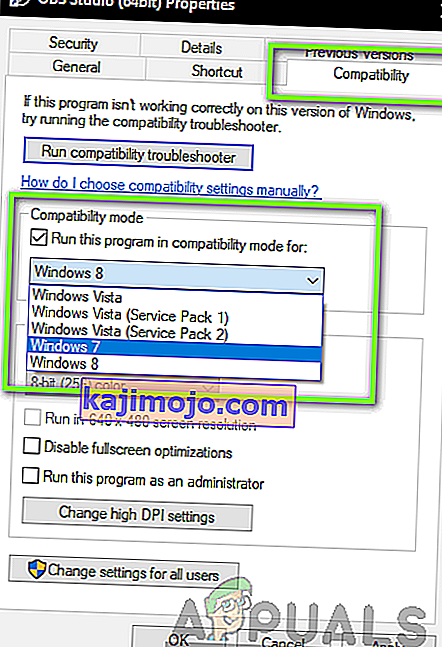
- Saglabājiet izmaiņas un izejiet. Tagad mēģiniet palaist lietojumprogrammu un pārbaudiet, vai problēma ir atrisināta.
4. risinājums: Administratora tiesību piešķiršana
Vēl viena problēma, kāpēc jūs nevarat pareizi straumēt ekrānu vai spēli, ir tā, ka jūsu lietojumprogrammai nav atbilstošu administratora privilēģiju. Tā kā OBS faktiski koplieto visu jūsu saturu un datora lietojumu tiešsaistē, ir svarīgi, lai jūs tam piešķirtu administratora tiesības. Šajā risinājumā mēs to darīsim un pārbaudīsim, vai tas problēmu atrisina. Pat ja tas tā nav, pārliecinieties, ka opcija visu laiku ir pārbaudīta.
- Navigate to OBS’s executable properties as we did in the previous solution.
- Now click on the Compatibility tab and check the option of Run this program as an administrator.
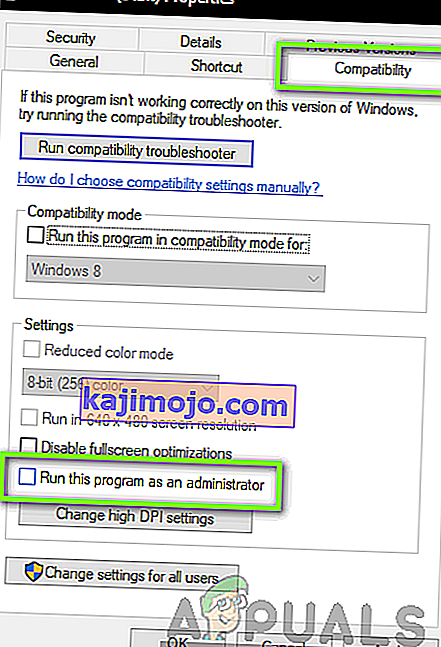
- Apply changes and exit. Restart your computer and launch OBS again. Now check if the issue is resolved.
Solution 5: Selecting the Correct GPU for Resources
Another interesting phenomenon we came across was where not selecting the correct GPU according to the capture you are using caused several issues including the black screen. The breakdown on which GPU to select according to the display selected is as follows:
- Game capture: Dedicated graphics (NVIDIA or AMD).
- Monitor/display capture: Intel’s stock GPU
Note: This solution is only for users who have a dedicated graphics card installed on their computer.
Here we will signify the methods on how to cater to both the situations. Make sure that you follow them according to your case.
- Right-click anywhere on your screen and select NVIDIA Control Panel.
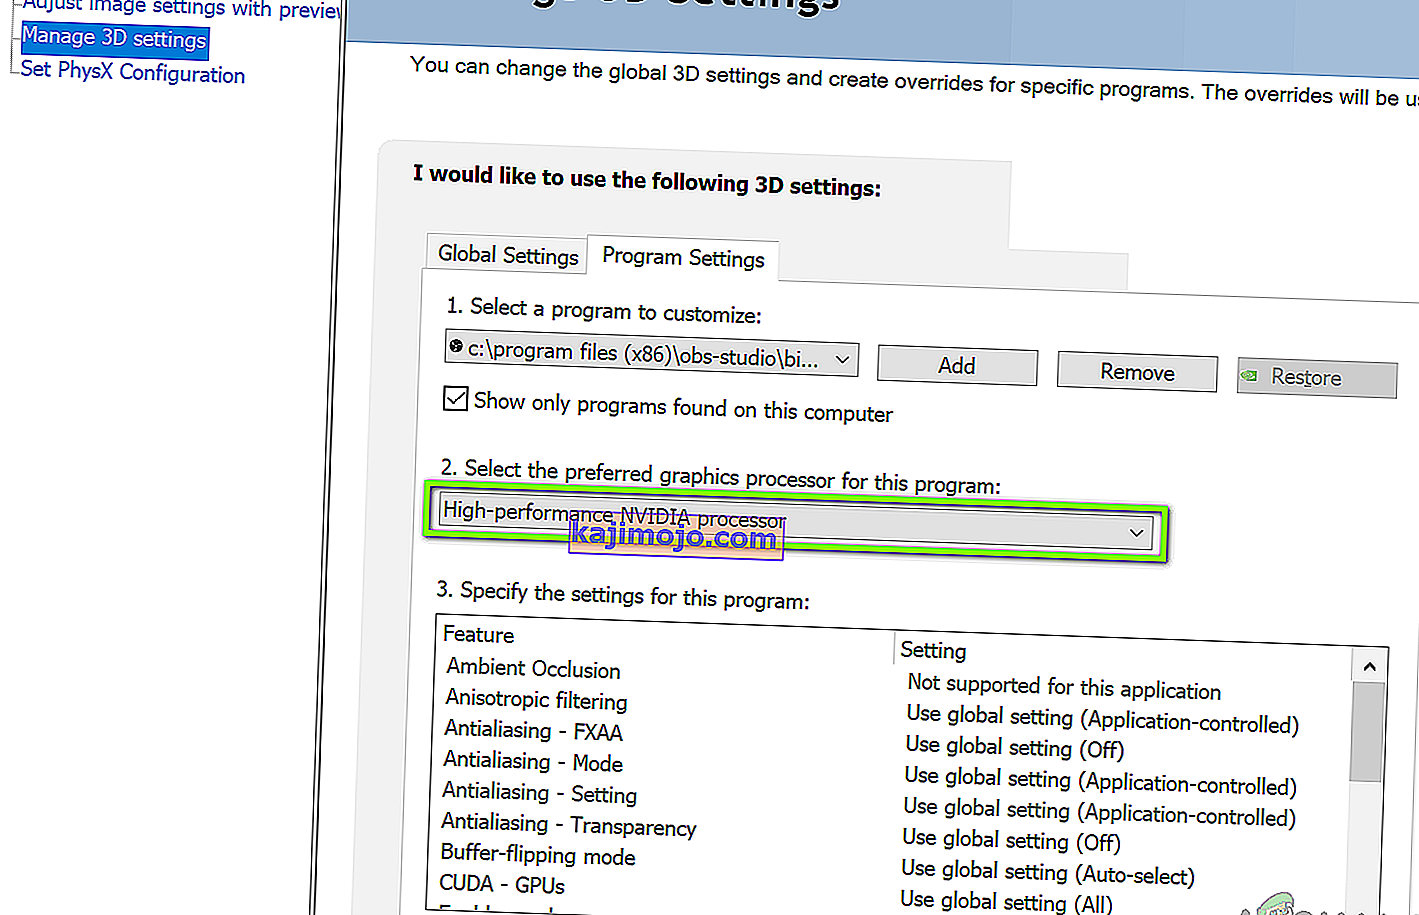
- Once in the control panel, navigate to Manage 3D settings and click on Program Settings.
- Once in program settings, select the OBS display capture. If you are not able to find the entry, click on Add and look up the software by navigating to its installation directory and selecting the executable from there.
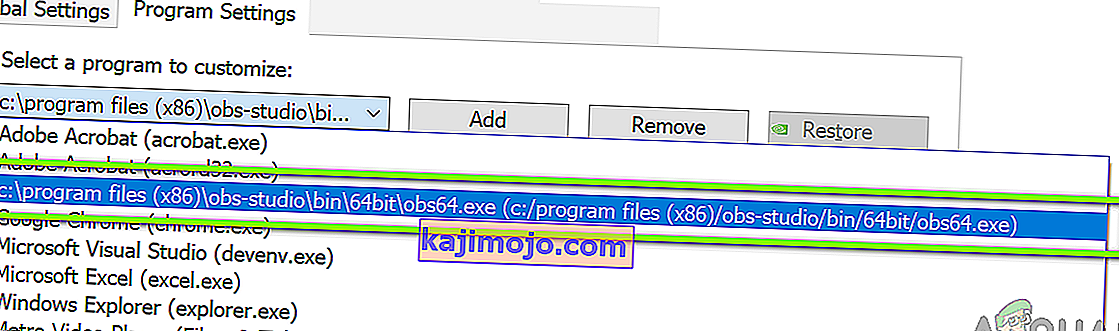
- Now according to the type of capture you are doing (game or monitor), select the correct graphics processor for the program. In the case down below, NVIDIA’s processor is selected.
- Save changes and exit. Now restart your computer and launch OBS again. Check if the black screen issue is resolved.
Solution 6: Changing Drive Permission Settings
If your OBS is installed in your primary drive (C), there are chances that probably even your user might have not have full permissions to edit and modify its contents. This is the usual case and the reason why a conventional user is not allowed access to the drive is because of security reasons because all the core operating system files are present. However, according to some user reports, changing the ownership settings of the drive solved the issue instantly. Make sure that you are logged in as an administrator before following this solution.
- Press Windows + E to launch the File Explorer. Now right-click on your C drive (or whichever drive is set as your main operating system disk) and select Properties.
- Select the Security tab and then click on Edit in front of permissions.
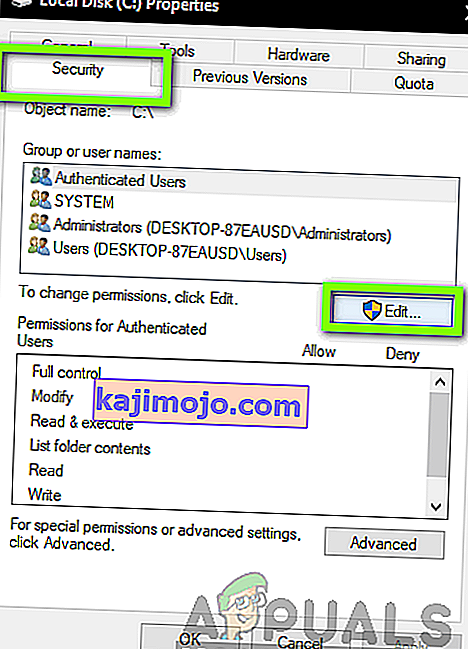
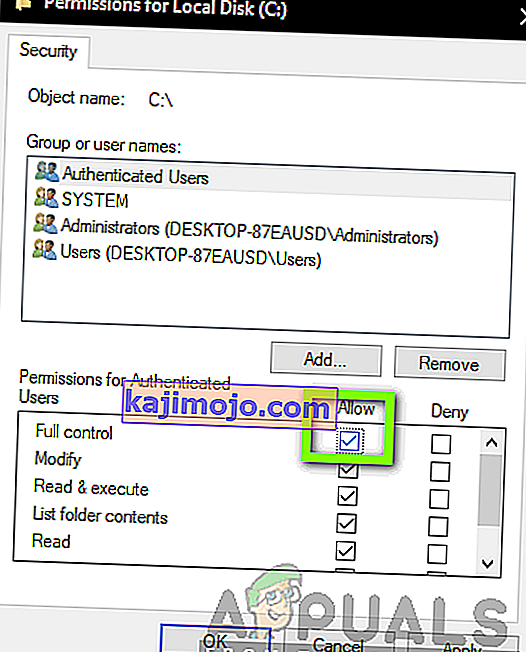
- Now select the option of Authenticated users and select the checkbox of Full control.
- Press Apply to save changes and exit. Restart your computer and start OBS again. Check if the issue is resolved.
Solution 7: Changing Settings of OBS
Another workaround to consider is changing some specific settings of OBS. Usually, OBS allows users to set the configurations according to their own preferences or will. However, in some cases, the custom settings might conflict with the software and cause the black screen. Here we have listed down some of the changes in settings that you have to do in order for OBS to run in optimal settings.
Mode: *Select according to your preference* Screen: *Select according to your game* Priority: *Usually the default one suffices* Sli/crossfire: Check (You can also try unchecking this one later) Force scaling: Uncheck Transparency: Uncheck Framerate lock: Uncheck Record cursor: Check Anti-cheat: Uncheck Overlays: Uncheck
After you have made changes to the settings of OBS, restart it and check if you can stream your screen/games properly without any issues.
Note: You can also change the mode from “Capture any fullscreen application” to “Capture specific window“.
Solution 8: Enabling Multi-adapter compatibility
OBS has a setting of Multi-adapter compatibility which is meant for computers involving SLI or Crossfire technology. SLI/Crossfire is technologies by NVIDIA/AMD which allows users to connect two graphics cards instead of one and utilize them both in your gameplay or applications. Enabling this feature seemed to have fixed the issue of black screen in OBS instantly.
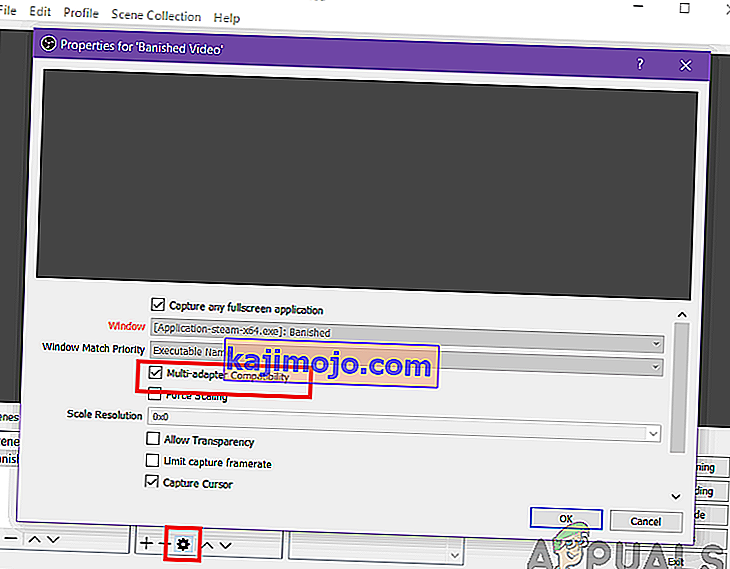
The funny thing is that this fixed the black screen in computers that don’t even have SLI/Crossfire technology installed. To conclude, we can safely say this is a bug in OBS and you have to enable multi-adapter compatibility whether or not you have SLI/Crossfire. You can easily enable this option by selecting the stream and clicking on the gears icon. A new window will pop up from where you can check the option.
Solution 9: Disabling Overclocking
Overclocking allows you to increase the clock rate of your processor until it reaches the threshold temperature set by the manufacturer. Once it reaches the temperature, the clock speed returns back to default so it is cooled down. After it reaches the optimal temperature, its clock speed is increased again and the cycle continues. Overclocking allows users to have better framerates and performance but they aren’t without their share of issues.
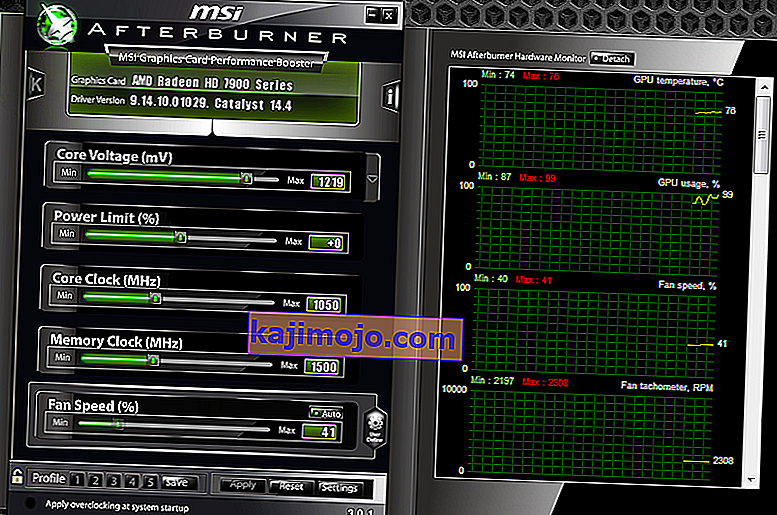
We observed that PCs that had overclocking enabled were having the black screen issue in OBS. You should try disabling overclocking and also overclocking related software such as MSI Afterburner and try launching OBS again. If the black screen issue is resolved, consider disabling overclocking for good whenever you are using OBS.
Note: Also try disabling Overlay from GeForce Experience and Windows game bar features. Take into account any additional software features which may provide additional controls over games or video.
Solution 10: Checking for conflicting software
Another reason why you might be experiencing the black screen on your OBS software is that you have additional software running in the background which is also related to screen capture and video recording. This is a very common scenario for users where they ‘think’ that the other third-party software is not running but in reality, it is in the background. In this solution, we will go through all the different software installed on your computer and uninstall all extra software which might be causing the issue.
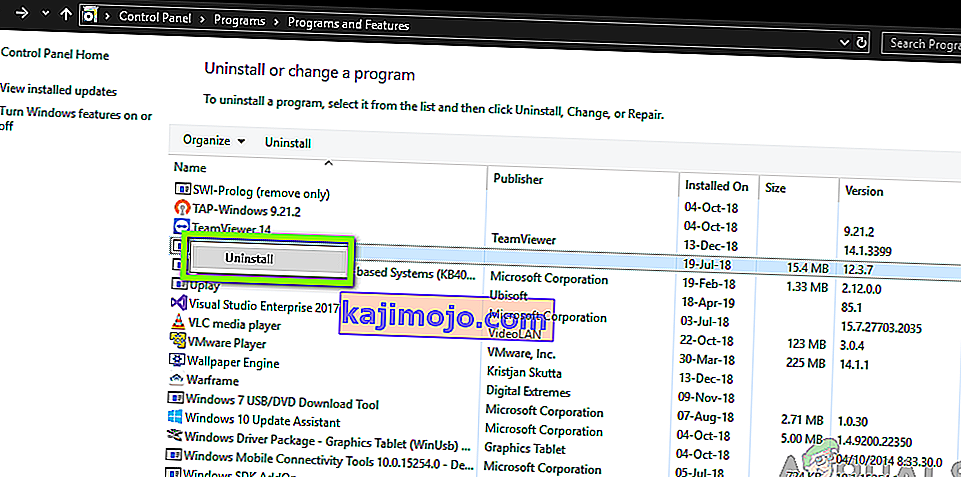
- Press Windows + R, type “appwiz.cpl” in the dialogue box and press Enter.
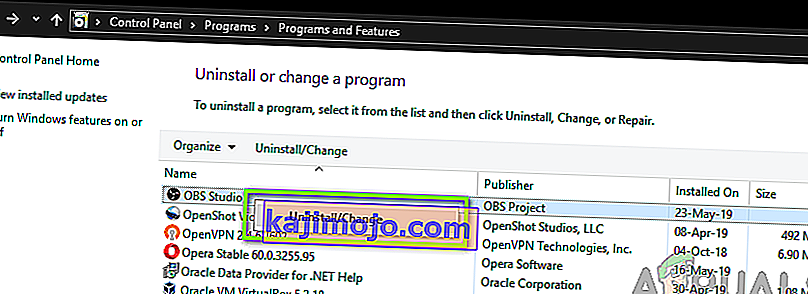
- Once in the application manager, search for any recording software which you might have installed on your computer. Right-click on it and select Uninstall.
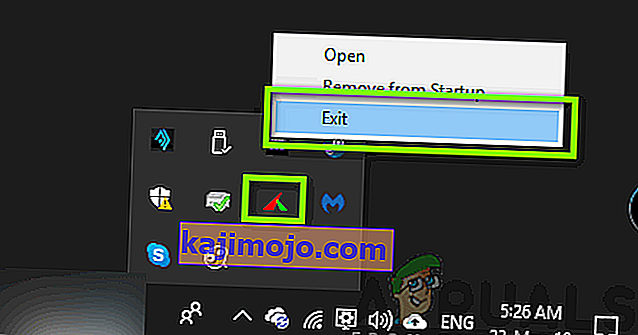
- You should also check your taskbar for any extra applications running in the background. Right-click on each entry and exit the application.
- After you are absolutely sure that no program is running the background, run OBS again and check if the issue is resolved.
Solution 11: Reinstalling the application
If all the above methods don’t work and you are still unable to stream your game/screen successfully using OBS, you should consider reinstalling the application entirely. It is possible that you have a corrupt/outdated copy with issues with several modules. All your preset configurations will be lost during this solution so make sure that you have saved all the work that you need.
- Press Windows + R, type “appwiz.cpl” in the dialogue box and press Enter.
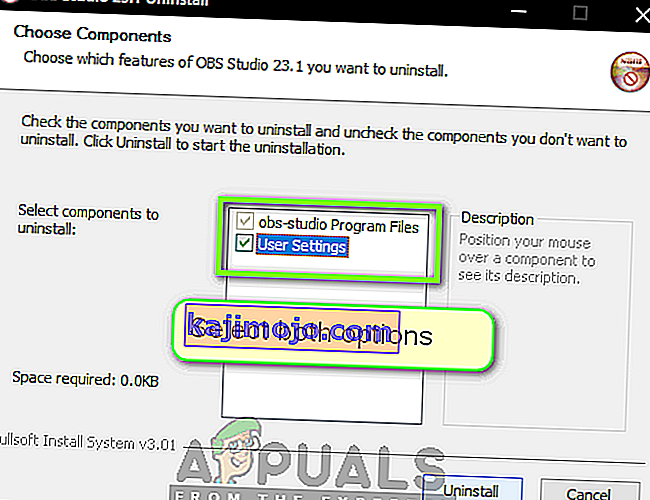
- Once in the application manager, search for OBS, right-click on it and select Uninstall.
- Select both options (one of them will be preselected) and click on Uninstall.
- Restart your computer. Now navigate to OBS Studio’s official website and download the latest version from there. Install it and check if the issue persists in the fresh copy.